• Integrated Digital Campaign Plan:
    The Cat Cafe and Rescue Center

    Company: Heather’s Cat Cafe and Rescue
    Campaign Theme: The Cat Cafe as Potluck at Rescue Center
    Core Narrative: “Come join us at the Cat Cafe. Have a coffee with Heather and the Famous Five Cats.”

    1. Company Overview

    Heather’s Cat Cafe and Rescue Center is a specialized community feline welfare hub. Unlike traditional shelters, it operates as a dual‑purpose facility:

    1. The Cat Cafe: A public‑facing social gallery where the “Famous Five” (founding resident cats) interact with the community in a relaxed, hospitable environment.
    2. The Care Center: A high‑standard, back‑end workshop where specialized medical care, nutritional stabilization, and behavioral preparation occur.

    Heather serves as the lead sponsor, providing the space and expertise, while inviting the community to act as co‑sponsors in the daily life and care of the residents.

    2. Problem

    Current outreach efforts face “compassion fatigue” caused by traditional crisis‑based messaging. The communication issue is twofold: a perceived high barrier to entry for participation and a lack of awareness regarding “micro‑contributions” and how helpful and useful they are.

    This campaign is necessary to position the brand away from a “charity in need” to a “community utility” where participation is seen as a natural, unthinking social habit with real life participation and firsthand‑witnessed benefits, rather than a pure fundraiser as burdensome request.

    3. Establish Goals

      1. Goal 1 (Engagement): Drive physical and digital traffic to the Cat Cafe to raise or increase awareness about the Center.
      2. Goal 2 (Resource Acquisition): Solicit indirectly one‑time or preferably subscriptions of food and/or litter donations through community “Potluck‑like” contributions.
      3. Goal 3 (Micro‑Funding): Communicate to participant/guests of the cafe the awareness of, permission to, and ability to easily and conveniently give items such as gift cards with full or even partial balances to help fund the Center.
      4. Goal 4 (Logistics): Recruit drivers and techs to Center needs, such as cleaning, socializing, or transport of the cats.

      4. Target Audience

      The “Neighbor‑as‑Community‑Collaborator”

      Profile: Local residents (ages 22‑65) who own pets or are “animal people.” They value community spaces and are likely to visit a cafe that have cats roaming throughout.

      Media Habits: They rely on hyper‑local social media (Facebook Neighborhood groups, Instagram), use mobile devices for “on‑the‑go” local searches, and engage with community bulletin boards.

      Motivation: They want to help but don’t think about how a $3 “scrap” of a gift card or 30 minutes of time isn’t “enough” for a traditional charity. They respond to the “Potluck” idea that it’s first need is to show up, and that any dish is OK.

      5. Campaign Messaging

      • Primary Theme: The Community Potluck.
      • Call to Action (CTA): “Come join us at the Cat Cafe.”
      • Critical Message Points:
        1. Low‑Barrier Entry: Showing up for coffee is the first act of care.
          1. The Open Tab: No contribution is too small; your “scraps” keep the Care Center running.
          2. Shared Responsibility: We aren’t asking for donors; we’re asking for neighbors to help care for the cats, however they can, as if they owned them.

      6. Media Mix

      OwnedInstagram/TikTok: “Daily Cafe” shorts (videos), designed for high‑engagement on mobile social platforms, feature the Famous Five cats as hosts.

      Website: An interactive “Potluck Board” showing real‑time needs and mobile‑optimized for neighbors checking needs on‑the‑go.
      EarnedCommunity Advocacy: Guests encouraged to create “Cafe Selfies” and tag the location to “Spread the Invite.”

      Partnerships: “Special Potluck Guests” highlighting local vets who donate time.
      PaidMeta Local Ads: Targeted “Sponsored Invitations” (pet food stores, dog walk parks, etc.) within a 5‑mile radius of the cafe to drive foot traffic.

      7. Campaign Timing and Frequency

      • Duration: Ongoing “Always‑On” community presence with 4‑week high‑intensity “Restock Blitzes.”
      • Frequency:
        • Daily: Short‑form “Lure” content (Famous Five cats, coffee shots, baked goods, homemade natural cat food and recipes).
        • Weekly: Updates to the community on what urgent “dishes” are needed, funny stories, cute poses, etc.
        • Monthly: Updates celebrating how many “scraps” were collected.

      8. Campaign Resources

      • Existing: Heather’s expertise, the physical cafe space, and the resident “Famous Five” cats.
      • Requested:
        • Technical: A simple digital “Open Tab” tracker for the website.
        • Creative: Minimal budget for Canva‑designed Cafe or “Potluck” signage and local social media ad spend ($100‑$200/month).
        • Human: Recruitment of the “Run Crew” (volunteer drivers) and “Cat Staff” (cleanup, feeding, socializing volunteers).

      9. Success Metrics

      • Foot Traffic: Number of “Seats Filled” in the Cafe weekly.
      • The Scrap Factor: Total dollar value of reclaimed gift card remainders.
      • Pantry Depth: Volume of physical food/litter contributions compared to the “Care Center” burn rate.
      • Digital Invitation Rate: Number of social media shares and neighborhood group mentions.

      References

        SmartInsights (n.d.). Marketing campaign planning.

        Vaughan, P. (2014). The essential, step‑by‑step guide to internet marketing. HubSpot.

        Social Media and WebSite Examples

          The following media demonstrate how the “Cat Cafe Potluck” theme is executed across digital channels to lower the barrier to entry and increase community participation.

          1. Digital Ad/Social Media Mockup Description

          Format: Instagram/Facebook Sponsored Post (Targeted 5‑mile radius of the Cafe)

          Goal: Goal 1 (Engagement/Foot Traffic) and Goal 3 (Reclaiming “Scraps”).

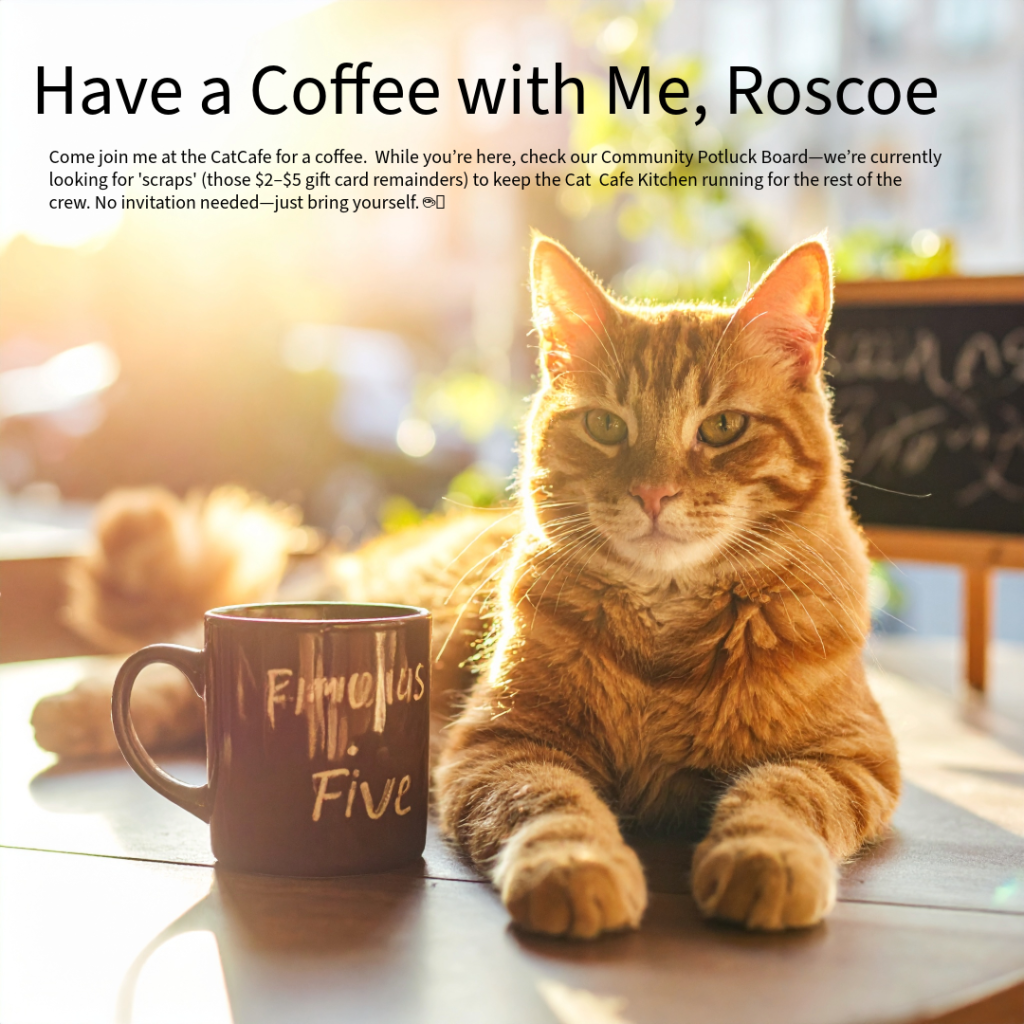
          The Visual: A beautiful, sunlit, close‑up photo of one of the “Famous Five” cats lounging next to a ceramic coffee mug. A vintage‑style chalkboard sign is blurred in the background.

          Overlay Text: “Have a coffee with me, Roscoe”
          Caption: “Come join me at the Cat Cafe for a coffee. While you’re here, check our Community Potluck Board—we’re currently looking for ‘scraps’ (those $2–$5 gift card remainders) to keep the Care Center running for the rest of the crew. No invitation needed—just bring yourself.”

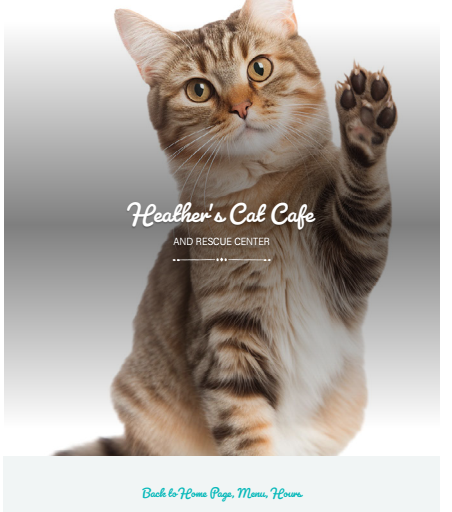
          2. Website Feature Mockup: “The Cat Cafe and Rescue Center”

          • Format: Simple web content on a Cat Cafe non-homepage.
          • Goal: Goal 2 (Resource Acquisition) and Goal 4 (Recruiting the “Drive Crew”).
          • Header: “Heather’s Cat Cafe” with sub header “and Rescue Center”
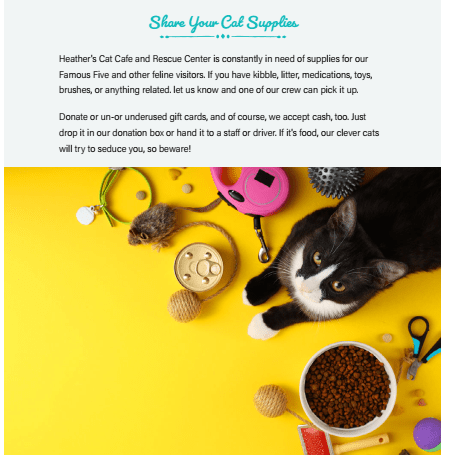
          • Section 1 Heading Share Your Cat Supplies
            1. Text: Heather’s Cat Cafe and Rescue Center is constantly in need of supplies for our Famous Five and other feline visitors. If you have kibble, litter, medications, toys, brushes, or anything related. let us know and one of our crew can pick it up. Donate or un- or underused gift cards, and of course, we accept cash, too. Just drop it in our donation box or hand it to a staff or driver. If it’s food, our clever cats will try to seduce you, so beware!
            2. Visual: Overhead photo of cat with various toys, kibble, care tools, etc.
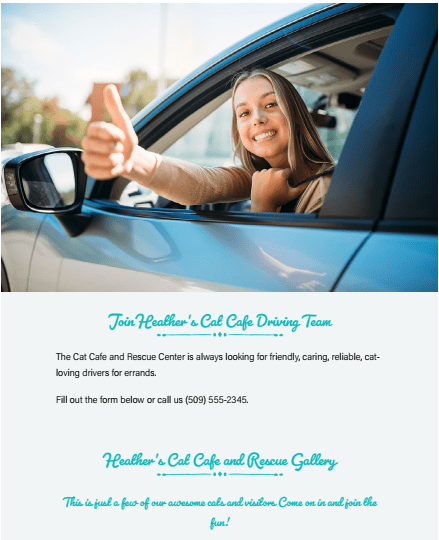
          • Section 2 Heading: Join Heather’s Cat Cafe Driving Team
            1. Visual: A very friendly and smiling woman in the driver’s seat of a car.
            2. Text: “The Cat Cafe and Rescue Center is always looking for friendly, caring, reliable, cat‑loving drivers for errands. Fill out the form below or call us (509) 555‑2345.”
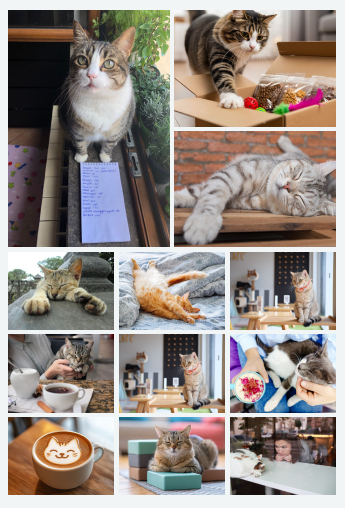
          • Final Section: The Gallery
            1. Text: “This is just a few of our awesome cats and visitors. Come on in and join the fun!”

        1. Build the Grid and Establish Structure

          The project began by constructing a three‑column, five‑row grid to give the poster a clear organizational framework. This grid became the backbone of the layout: the left column was dedicated entirely to the hero image, while the right two columns held all text and branding elements. This structure helped ensure continuity and made the visual hierarchy more intentional. Peer feedback emphasized that the purpose of the campaign was already clear and engaging, so the grid served as a way to support that clarity and keep the design focused. I anchored the figurines on the left then distributing text across the remaining columns. I also added a dark charcoal background to highlight the colors of the figurines and to make the campaign materials a bit more dramatic while still somewhat playful.

          Refine the Logo and Improve Readability

          I removed the logo text from inside the cat‑head silhouette and set the text label beside the logo. This adjustment preserved the playful, recognizable identity that peers praised while improving legibility and balance. I scaled the logo to occupy only part of the grid cell, giving it breathing room and preventing it from overpowering the surrounding text. Because the black logo was lost in the new charcoal background, I added a shadow so that the outline of the cat’s head would be visible. Another change to readability, now with the dark background, was to change the font colors to something other than black (on white background). I used some of the colors from the figurines because I figured they would be in harmony, and as a result, used a gold for title, white and off white for description text, and a dark but visible blue for the Call to Action at the lower right grid cell.

          Revise Text Elements for Clarity, Hierarchy, and Accuracy

          I reorganized the text elements to make the message clearer and more readable. Now, the slogan and subtitle were placed at the top of the poster, centered across all three columns, giving the design a strong opening statement, which addressed feedback from peers in my draft. I enlarged the body text to improve readability, also directly addressing feedback that it seemed too small compared to the call to action. I saw and fixed a silly typo from the draft that one reviewer caught.

          Create and Highlight a Call to Action and Ensure Visual Flow

          I had used “Come Visit” as a call to action (CTA) already knowing it was weak and hoping that time with the design and feedback might help stimulate something new. Most of my reviewers agreed. In any case, I finally came up with and used “Catch some zoomies and come visit the Center for Cats to feed your inner kitten,” which I thought adds personality and aligns energy of the content and campaign. To ensure it stood out visually, the CTA was placed in Row 5, Columns 2–3, right‑aligned, and set in blue that contrasts with the charcoal background. This addressed feedback that the CTA needed more prominence and that the hierarchy could be strengthened. With the slogan in soft white at the top and the CTA in blue at the bottom, the poster now guides the viewer’s eye naturally from introduction to action.

          Make Final Adjustments

          As before in my draft, I reused the elements from the poster on the other templates, noting this time, that brochures have cover pages and inner pages. For this reason, I placed the main images and titles on what appears to be the right side, which is in fact the cover of that template. I sized the text elements to match the templates, ensuring the design still flowed hierarchically and naturally (white space, aligned, etc.). I sized the logo and figurines images to match the poster, more or less with figurines anchoring the lower right side and the logo centered prominently, though subtly throughout all templates.

          The Campaign Materials Now

        2. The “Center of Cats” campaign began with a simple idea: transform my small collection of cat figurines, objects gathered over years of travel, into the foundation for a cohesive visual identity. Their variety in style, era, and cultural origin suggested to me the concept of a multimedia exhibition space dedicated to the global history, art, and cultural presence of cats. From that spark, I developed a brand identity, photographed my subjects, and assembled a series of print and social media materials that communicate a single message: Come Visit.

          Building the Brand Identity

          I approached creating a simple logo with design principles of clarity, unity, and scalability in mind. Using Adobe Illustrator, I was able to create a stylized cat‑head silhouette from basic geometric shapes, an oval for the face and two triangles for ears. I figured that a geometric construction with clean edges and predictable scaling would help with visual consistency across all the various campaign media sizes.

          After exporting the vector, I imported it into InDesign and dropped on top of it my fictitious organization’s name, Center of Cats. I selected a bold, high‑contrast typeface color to establish a clear typographic hierarchy, which helped ensure legibility even at small sizes. The combination of a minimal silhouette and contrasting typography created a contemporary identity that I thought both playful and educational.

          Research and Messaging Strategy

          From my travels and visits to similar organizations, such as museums, galleries, and themed exhibitions, I recalled how they use emotional appeal, cultural references, and narrative framing to attract visitors like me. For my subject matter, curiosity and nostalgia are qualities I believe cats naturally evoke. Rather than over‑explaining the exhibition in long text, I chose to combine my simple silhouette cat logo with a simple and direct call to action: Come visit.

          The tagline plays on the shared curiosity of cats and humans, inviting visitors to explore the exhibition with the same inquisitiveness that cats bring to the world.

          In my longer text, not included on the campaign materials in full, I include references to celebrity cats, historical cats, and internet‑famous cats to hint at the breadth of content the Center would offer. These touches reinforce the idea that cats are woven into global culture in ways both serious and whimsical.

          Writing the Body Copy

          Although the final campaign materials use only short excerpts, I drafted a longer 500–1,000‑word body text to establish tone and thematic direction, as required by the assignment. I imagined the experience of walking through the exhibition: the textures of textiles, the shapes of sculptures, the soundscape of purring or historical narration, and the visual diversity of cat‑related art. This exercise helped me identify which phrases and ideas would translate best into concise copy, which I used sparingly, for the poster, social media, and print layouts.

          I have not finalized captions for the photographs yet, but I may add them after peer review. Captions could help clarify the cultural or stylistic origins of each figurine, reinforcing the educational aspect of the exhibition.

          Photographing the Figurines

          The figurines themselves became the subjects of the campaign’s imagery. Following the assignment guidelines for bold, tightly framed images and the rule of thirds, I removed the figurines from my windowsill and arranged them on my workbench. I photographed them against a plain white wall using my smartphone, intending to remove the backgrounds to make space for text placement.

          To create visual variety in the layout, I experimented with angles, framing, placement, and as I wrote background or the transparency thereof. I decided that the images looked best to me grouped together as a sort of universal cat family.

          Lighting consistency of the photographed figurines was a challenge. The figurines differed in size, reflectivity, and color temperature, which meant shadows and highlights behaved unpredictably. I adjusted my phone’s angle relative to the overhead light to keep each figurine evenly lit and in focus. Once I had enough variations, I transferred the images to my computer for color correction and editing.

          Editing the Images: Background Removal and Color Correction

          My first step in post‑production was to isolate each figurine using Adobe Creative Cloud’s background removal tool. Exporting them as PNGs with transparent backgrounds gave me maximum flexibility when placing them in the layouts.

          Next, I opened each PNG in Adobe Photoshop to correct mismatched white balance and unify the lighting across the set. Using Camera Raw Filter (Filter → Camera Raw Filter), I adjusted temperature, tint, exposure, and highlights. I also used Curves to fine‑tune contrast and ensure no single figurine visually dominated the others. These adjustments helped establish a consistent visual tone across the campaign photographs.

          Assembling the Campaign in InDesign.

          With the images and text prepared, I opened the instructor‑provided InDesign templates and reviewed the layout notes for each format. Each template had different spatial constraints, so I approached them individually, importing my edited PNGs using File → Place.

          For each of the formats, I used tools including Align, proportionally sizing to avoid distortion, character sizing and type for text, and paragraph styles for the slogan, tagline, and body text.

          I attempted to keep all formats relatively consistent by reusing the figurines family in a similar position, as I did with the logo. The intention was to maintain the look of a single campaign rather than separate experiments.

          Once the layouts were complete, I exported the project as a PDF using File → Export → Adobe PDF (Print).

          Refining the Draft and Preparing for Feedback

          Because peer review is part of the process, I intentionally avoided over‑refining the designs at this stage. I expect to adjust color balance, spacing, and text placement after receiving feedback, so my focus was on establishing a strong, consistent foundation rather than perfecting every detail. The current draft demonstrates continuity across formats, a clear visual hierarchy, and a cohesive brand identity built from simple content and accessible tools, at least with which my capabilities match as of today.

          The Essay

          The Campaign Materials

        3. In this post, I walk through how I revised my original Shaw Center for the Arts promotional materials and turned my draft into a more polished final design. This project required me to create an event poster, an Instagram post, a Facebook post, an invitation, and a social media comment using Adobe InDesign. What follows is my walk‑through of the whole process—from the draft, to the feedback, to the revisions I made in InDesign.

          Revisiting My Draft and Identifying What Needed Work

          When I created the draft, I approached the assignment as a novice trying to learn the basics of layout, hierarchy, and typography. I relied on intuition and the course readings, but I knew the draft had issues. The poster felt dense, the text overlapped the main image in ways that hurt readability, and my alignment wasn’t as precise as it needed to be. I also realized that working on a 13.3‑inch laptop screen is not ideal for layout work, but it’s the computer I have, so I made it work.

          Before revising anything, I reread the assignment instructions to make sure I understood the expectations for the final. I also reviewed my own draft with a more critical eye, paying attention to where the hierarchy felt unclear and where the layout felt cramped. That gave me a clearer sense of what actually needed fixing before I opened InDesign again.

          What My Classmates Noticed in Their Feedback

          The peer feedback was genuinely helpful. My reviewers pointed out that my draft had strengths—especially in visual organization, consistency across formats, and the way I used size hierarchy to guide the viewer’s eye. They also noted that using the same theater image across multiple pieces created a unified visual identity, which was exactly what I hoped would come through.

          At the same time, they identified several issues I needed to address. One reviewer noted misalignment between text blocks and images, which made the layout feel less intentional. Both reviewers mentioned that the white text blended into the bright areas of the theater photo, making it difficult to read. Another reviewer pointed out that my line spacing was too tight, causing letters from different lines to overlap. All of that basically confirmed what I already suspected: the draft needed more breathing room, better alignment, and improved readability.

          How I Revised the Design for the Final Version

          Once I had the feedback in front of me, I started making changes. First, I redesigned the title so it appears more prominent and bold. That small change made the hierarchy much clearer and made the event name easier to see at a glance. I also reduced the size of less essential text so the most important information stands out more clearly.

          Next, I introduced more white space throughout the layout. In the draft, I tried to fit too much text into too little space, which made the poster feel heavy. Adding white space helped the design breathe and made the content easier to read. I also experimented with an alternate layout, influenced both by revisiting my own draft and by looking at how my peers approached their designs. Looking at their work helped me rethink my own spacing and alignment choices.

          Finally, I corrected the readability issues by moving text off the brightest parts of the photo and adjusting the contrast where needed. This made the event details much clearer and more accessible.

          InDesign Techniques I Used to Improve the Final

          As I revised the project, I relied on several InDesign tools that I didn’t fully understand when I created the draft. I used more advanced typography tools, including adjustments to leading and kerning, which helped fix the spacing issues my classmates pointed out. I also used the fitting tool to match images to their frames more precisely, which solved some of the alignment problems.

          Another big improvement came from finally getting more comfortable with moving, resizing, and aligning things. In the draft, I relied too much on eyeballing placement. In the final version, I used InDesign’s alignment features to make sure text blocks and images lined up cleanly. This made the layout feel more intentional and professional.

          Finally, I used zoom in and out quite a bit more often, working on sections at a time, so that even with my small laptop screen, I was able to revise all the deliverables.

          What I Learned Through the Revision Process

          For me, this project really drove home how iterative design actually is. My draft wasn’t perfect, but it gave me and my reviewers something to react to. The feedback helped me see what I couldn’t see on my own, and the revision process helped me understand InDesign a bit better. I still have a lot to learn about layout and visual communication, but I believe that with more practice—and more time experimenting with the software—I’ll be able to work faster and make stronger design decisions.

          Overall, I’m proud of how the final materials turned out. They feel clearer, more readable, and more intentional than the draft. And honestly, they show what I learned along the way.

          Here’s My Final

        4. In this post, I describe an assignment to design several promotional pieces for the Shaw Center for the Arts — a project that was both a creative challenge and a technical learning experience. Using the information provided and five required photos, I created a draft set of materials: an event poster, an Instagram post, a Facebook post, an invitation, and a social media comment.

          My goal was to communicate the essential event information clearly while also capturing the architectural character of the Shaw Center. In what follows, I walk through my design process, the visual communication principles that shaped my decisions, and the Adobe InDesign techniques I used to build this first draft.

          I should also be upfront: I am a novice in both layout design and Adobe InDesign. I approached this assignment as an opportunity to learn, experiment, and improve. I plan to refine these materials further before the final due date.

          My first step was simply to read the assignment instructions carefully and make sure I understood the requirements. If I missed anything in this draft, I will correct it in the final version.

          My Design Process

          Next, I reviewed the provided text, examined the photos, and looked at the different sizes and formats needed for each media piece. I spent time imagining possible layouts and visual arrangements before opening InDesign.

          I also reflected on posters and promotional materials I’ve seen for arts centers, grand openings, and similar events. Thinking about where these pieces might be displayed — and who would be viewing them — helped me prioritize information. Our readings emphasize that designers should consider how people gather information and how limited attention spans shape visual hierarchy. That guided my decisions about what needed to be most prominent and what could be placed in less visually dominant areas.

          How I Executed the Draft Design

          From the videos and earlier exercises, I learned some foundational techniques related to layout, white space, and typography. Applying those lessons to a full poster and accompanying media set, however, was a much bigger leap than I expected.

          I began by selecting the five required photos. The idea of a grand opening made me think of a stage and curtain, so I chose that image as my anchor. I placed it across the top of the page, filling the width, because it created a strong visual entry point and felt appropriate for the theme.

          Next, I copied the event title and subtitle into two separate text boxes. I formatted them in a sans serif typeface, following the guidance from our readings that sans serif fonts often work well for titles. I experimented with several placements but ultimately positioned both lines at the top, in white text over the main photo. This saved space and created a cohesive relationship between the text and the image.

          I then arranged the remaining four photos, trying to avoid trapped white space and to respect natural eye movement patterns. I attempted to balance color, contrast, and visual weight across the layout, though I’m eager to hear feedback on whether those choices work effectively.

          Placing the text was the most challenging part. I prioritized the essential event information by overlaying it on the main photo, keeping it immediately visible. The rest of the text felt less necessary for this type of promotional material, but the assignment required its inclusion. I experimented with different sizes, fonts, and placements, but eventually filled the remaining space with the text. In hindsight, this made the poster feel dense and visually heavy, especially when viewed at a smaller scale.

          What I learned so far:

          1. my little 13.3 inch laptop screen is a POOR CHOICE for graphics and layout, but it’s my computer and I’m sticking with it
          2. I have a lot to learn about the InDesign software to help make prototyping much faster. I believe once I master the platform, I can experiment with more layouts and options quicker.
          3. 3) I need to understand and practice more with layout and communication. I am certain that, like most crafts and skills, practice will help a lot.

          Regarding the final product: My hope is that feedback from classmates will help me refine the hierarchy, reduce visual clutter, and make stronger decisions in the next iteration.

          And Now, My Draft…

        5. Problems I most often help resolve often come to those who did not consider the whole of a situation, vs. just their individual role or contribution. We can see examples of this in technology choice and usage, sport, lifestyle, education, and business.

          What appears to be the problem is often very superficial and noticeable. It may be the most obvious (visual) facet or perhaps the most assumed-to-be-painful part. While both of these parts do in fact need to be addressed in most cases, they most certainly do not make up the whole of the problem

          Below I provide links to some YouTube videos that demonstrate, at least for me, that this whole vs. parts affects a variety of domains. I include one that many students are familiar with, that being that remote or online learning (or work from home) is easy and efficient what with internet everywhere and technologies such as Teams, Zoom, and the like.

          A second example is one of a very typical dream job, which is that of working and traveling in exotic locations, leaving personal problems and worries behind. Make a living, stay healthy, earn income, and see the world? What could go wrong is never even part of the question.

          Next example is a common one, which is that if a person puts his/her/their mind to changing a habit, it is only a matter of time before that habit is part of a new lifestyle. Good luck with that!

          Finally, there has been a lot of underestimating about human vs. animal, as to how many men can take how many beasts. Sure, one could predict results using body weight, height, and intention, but again, these are only a few of the facets of the entire problem space. Have a look at the Three big guys vs. one lioness example for what I mean.

          Examples

          First perspectives make the solution seems easy and straightforward. Someone fixed the obvious problem with a ‘solution’ and we are led to believe that’s it, problem solved. And the good news is that the solution does in fact often solve those specific parts of the entire problem…..but we are still left with the other facets that need to be addressed.

          What to do, if anything? I think as an effective and results-oriented strategic communicator, we need to take a little extra time – though not too much – to sit and breath with the WHOLE problem and not just with the obvious facets.

          In my next post, I’ll give you some examples and thought experiments to show what I mean.